


ターミナルがダサいとモテない。macOSとLinuxのXDG_CONFIG_HOMEを共有するぞ - yadm編


Photo by Ferenc Almasi on Unsplash
Batch management of XDG_CONFIG_HOME on macOS and Linux with yadm
恵比寿でIT企業をやっているとモテると聞いて創業しましたが早いことありがたいことに10年目に突入した長谷川です。
まだモテる成果は出ていません、、、これからです!(もうめんどくさいのでカウントやめました😆)
最近、少しだけLinuxをお触りするお仕事をしていて・・・ふと思ったのが・・・
macOSばかり触っているから、macOSの中身をめちゃくちゃ弄くり倒していて、抜き身のUbuntuやDebianが痒くて触りにくくなってしまうという・・・😅
vimだときつくてNeoVim使いたくてAstroNvim使いたくてと・・・
lsだとちょっとezaが・・・とか
starship欲しいなとか・・・
出てくる出てくる🤣
そこでyadmです。
yadm
Yet Another Dotfiles Manager
こんな紹介がされています。
Yet Another Dotfiles Manager
When you live in a command line, configurations are a deeply personal thing. They are often crafted over years of…
yadm.io
ざっくり紹介すると以下です。
- XDG_CONFIG_HOMEのgit化
- alternate filesによるdotfilesの管理
- 暗号化と復号化
- bootstrapによるscript runner
- git cloneするだけで外部依存が少ない(Install方法はいろいろあります)
ただし注意点として、最低限gitがCommand-Lineで扱える必要があります。
それでは実際にyadmの各種機能を紹介していきます。
Install yadm
Installation
OSX
yadm.io
いろいろなOSやDistribution向けのInstall手法がこちらで紹介されています。
macOSならhomebrewでInstallできます。
brew install yadmgitでcloneする方法もあります。
Installation
OSX
yadm.io
git clone https://github.com/yadm-dev/yadm.git ~/.yadm-project
ln -s ~/.yadm-project/yadm ~/bin/yadm
自分は以下のような形でInstallしました。
declare repo=https://github.com/yadm-dev/yadm.git
declare deploy_to=${HOME}/local/yadm

if [ ! -d ${deploy_to}/.git ]; then
  git clone --depth 1 ${repo} ${deploy_to}
else
  git -C ${deploy_to} pull
fi

# PATH通したければ以下
declare -x PATH=${deploy_to}:${PATH}
PATHはどうぞお好きにしてください。
yadm help
まずはhelpを叩きましょう。
新しいコマンド触るときは最初にhelpを見る!これ基本!
❯ yadm --help
Usage: yadm <command> [options...]

Manage dotfiles maintained in a Git repository. Manage alternate files
for specific systems or hosts. Encrypt/decrypt private files.

Git Commands:
Any Git command or alias can be used as a <command>. It will operate
on yadm's repository and files in the work tree (usually $HOME).

Commands:
  yadm init [-f]             - Initialize an empty repository
  yadm clone <url> [-f]      - Clone an existing repository
  yadm config <name> <value> - Configure a setting
  yadm list [-a]             - List tracked files
  yadm alt                   - Create links for alternates
  yadm bootstrap             - Execute $HOME/.config/yadm/bootstrap
  yadm encrypt               - Encrypt files
  yadm decrypt [-l]          - Decrypt files
  yadm perms                 - Fix perms for private files
  yadm enter [COMMAND]       - Run sub-shell with GIT variables set
  yadm git-crypt [OPTIONS]   - Run git-crypt commands for the yadm repo
  yadm transcrypt [OPTIONS]  - Run transcrypt commands for the yadm repo

Files:
  $HOME/.config/yadm/config        - yadm's configuration file
  $HOME/.config/yadm/encrypt       - List of globs to encrypt/decrypt
  $HOME/.config/yadm/bootstrap     - Script run via: yadm bootstrap
  $HOME/.local/share/yadm/repo.git - yadm's Git repository
  $HOME/.local/share/yadm/archive  - Encrypted data stored here

Use "man yadm" for complete documentation.
gitのwrapperになってるのがわかりますね
yadm init
yadmでdotfilesとXDG_CONFIG_HOMEを管理し始めます。
いきなりmacOSで構成を始めないで、なにかVMを立てて何が起きるかも含め確認しながら進めた方が良いと思います。
dotfilesと.configのバックアップも忘れずに!😅
オフィシャルのGetting Startedに記載があります。
Getting Started
Starting out with yadm should be just a few easy steps.
yadm.io
yadm init
yadm add <important file>
yadm commit
yadm commitは-mでコメント入れたりすることもできるみたいです。
プログラマーの方はgitをCommand-Lineで処理するので、ちょっとCLIでgitする練習しといた方がいいかもしれないですね。(自分も最近はlazygitを使っていて、ちょっと久しぶりすぎて😂)
gitのrepository urlを入れてbranch指定するのは以下です。
yadm remote add origin <url>
yadm push -u origin <local branch>:<remote branch>
yadm clone
同じくGetting Startedに記載があります。
Getting Started
Starting out with yadm should be just a few easy steps.
yadm.io
yadm clone <url>
yadm status
yadm Common Commands
どんなSub-Commandがあるのかはこちらをみればわかります。
Common Commands
Most of these operations will look like Git commands; because they are.yadm wraps Git, allowing it to perform all of…
yadm.io
またyadm statusにはgit statusと同じで-unormalがあります。
yadm status -unormalFrequently Asked Questions
Categories
yadm.io
Usageの”How can I display untracked files with a yadm status command?”に記載があります。
yadm status -unormalそれではここから、yadmの基本的な機能の紹介をしていきます。
Bootstrap
Bootstrap
Often there is more to set up once your dotfiles repository has been cloned. Forexample, if your repository has…
yadm.io
実際にyadm cloneした時にbootstrapを起動するか、y/nで聞かれるみたいです。
また –bootstrap や –no-bootstrap といったオプションもyadm cloneにはあります。
$HOME/.config/yadm/bootstrapとしてShell Scriptを配置すれば動かすことができます。
bootstrap.d
またページ下部を見てもらえるとわかるのですが、サポートScriptが用意されていて複数のScriptに分割する拡張することができます。
https://raw.githubusercontent.com/yadm-dev/yadm/master/contrib/bootstrap/bootstrap-in-dir
自分は上記のSupport Scriptを使わずに自前で作ったScriptで処理しています。
自分のbootstrapは以下のようになっています。
tree ${HOME}/.config/yadm/
├── bootstrap
├── bootstrap.d
│ ├── asdf
│ ├── astrocommunity
│ ├── envutils-darwin
│ ├── envutils-linux
│ ├── gobrew
│ ├── luaver
│ ├── mustache
│ ├── rerun
│ ├── rustup
│ ├── tmux-tpm
│ ├── uv
│ └── voltaまだしっかりできてないのですが、以下のようなfunctionを組んだShell Script郡になっています。
- OS Check
- yes or no prompt
- pre bootstrap
- bootstrap
- post bootstrap
Alternate Files
Alternate Files
When possible, it is best to use the same files across all systems. However,there are occasions when you need different…
yadm.io
Symlink alternatesにはcondition attributeという仕組みがあります。
最初は戸惑いましたが、試しにひとつファイルを作ってみるとなんのこっちゃない話でした。
今回の主題はmacOSとLinuxを相互に管理するなのでここで使うのはos attributeかな?
ex) ${HOME}/.gitconfig
例えばHOMEの.gitconfigをsymlinkしたいとします。
ここで紹介する.gitconfigについてはあくまでも例です。
XDG_BASE_DIRの考え方でしばらく自分のコンピュータを触っていると理解して貰えると思うのですが、基本的に${HOME}にあるいわゆるrcfile系のdotfiles郡について${HOME}配下に配置しない方が良いと思います。
yadmの管理に複雑さをもたらしてしまいます。
またXDG_CACHE_DIRやXDG_STATE_DIRやXDG_DATA_DIRなどは移動してしまうと、チームで共用しているサーバなどでは混乱を発生させる可能性もあると思います。
とはいうものの、正直なところ好みの問題だと思うので個人の選択と判断で責任を持って管理すれば良いと思います。
その場合のalternate fileは、
${HOME}/.config/yadm/alt/.gitconfig##defaultになります。
##defaultを利用すると特に条件なしにHOMEにsymlinkします。
これをOS別に分けたい場合は以下です。
macOSだけsymlinkしたい場合は以下
${HOME}/.config/yadm/alt/.gitconfig##os.Darwin
Linuxだけsymlinkしたい場合は以下
${HOME}/.config/yadm/alt/.gitconfig##os.Linux
このようにすることで、OS別でsymlinkのするしないをコントロールできます。
Templates
またalternate filesにはtemplate engineがあります。
Templates
Templates are a special kind of alternate file. The templatecontent and host specific data are combined as input to a…
yadm.io
自分はtemplate engineのprocessorには4種類あります。
- default
- esh
- j2cli
- envtpl
自分はdefaultしか使っていないのでここではdefaultの説明をします。
どんなtemplate処理ができるのかというとExposed dataに記載があります。
今回、自分が使ったのはyadm.osくらいでした。
example) ${HOME}/.config/yadm/alt/.bash_private
###############################################################################
# fastfetch
{% include ".bash_private.d/fastfetch/fastfetch" %}
上記のようにinclude文も使えます。
${HOME}/.config/yadm/alt/.bash_private.d/fastfetch/fastfetchは以下
declare -x enable_fastfetch=true
if command -v fastfetch &> /dev/null; then
  if "${enable_fastfetch}"; then
    fastfetch
  fi
fi
yadm altを実行するとsymlinkが貼られます。
example) ifとyadm.osを利用したtemplateの条件分岐
以下のように記載することでmacOSではhomebrewを
Linuxではlinuxbrewを使うことができます。
{% if yadm.os == "Darwin" %}
# homebrew
{% include ".bash_private.d/homebrew/homebrew.{{ yadm.os }}" %}
{% endif %}

{% if yadm.os == "Linux" %}
# linuxbrew
{% include ".bash_private.d/linuxbrew/linuxbrew.{{ yadm.os }}" %}
{% endif %}
実際のファイル配置は以下のようにすれば読み込めます。
homebrew.{{ yadm.os }}となっているのでOSに置換されます。
- ${HOME}/.config/yadm/alt/.bash_private.d/homebrew/homebrew.Darwin
- ${HOME}/.config/yadm/alt/.bash_private.d/linuxbrew/linuxbrew.Linux
実際の自分のalt directoryの中はこのようになっています。
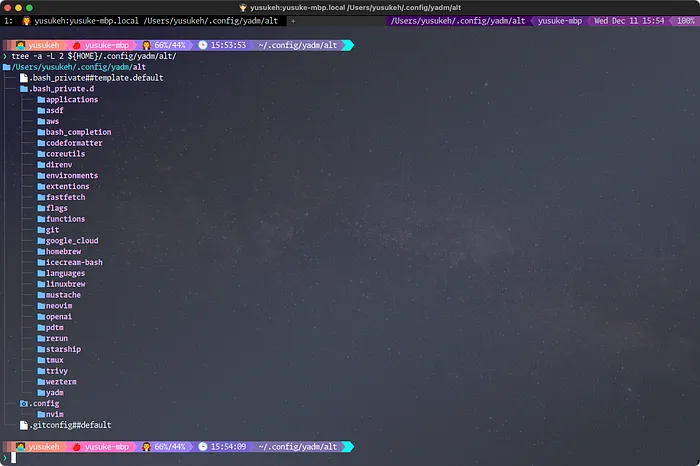
もともと、いろんなものを自由に組み込み、管理し外すことができるようにするためにこのような形にしています。
もともとbashの設定をかなり拡張していて・・・😅
もはや、ほとんど趣味の世界なんですが・・・
よく見るとweztermやneovimのpluginなどmacOS上でしか使わないものなどもあり、このyadm alternate filesとtemplateとconditionの仕組みを使いコントロールすることができました。
例としてはneovimのim-select.nvimなどはmacOS上でしか使わないため、無効化しています。
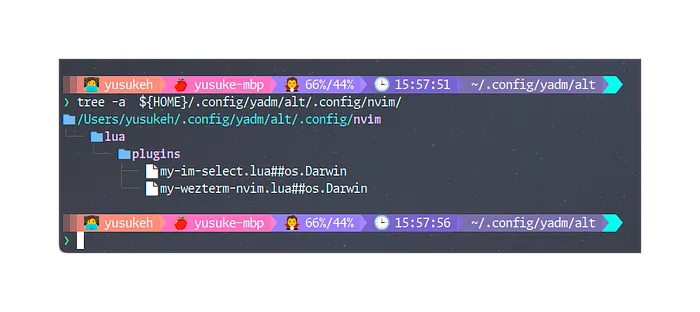
最初はNeoVimのluaの中でOS Checkしてたのですが、AstroNvimはplugins directoryにファイルがあると検知してnilが返ってErrorでるのでやめました😅
ファイルを個別にするなと言われると、その通りなんですが、管理しやすいので・・・😅
他にはenv.VARなど環境変数から取り込む機能もあります。
yadm encrypt/decrypt
yadmにはファイル群に対しての暗号化と復号化機能を持っています。
Encryption
It can be useful to manage confidential files, like SSH keys, across multiplesystems. However, doing so would put plain…
yadm.io
デフォルトではgnupgを利用するようです。
opensslに変更することも可能みたいです。
オフィシャルではsshの鍵を設定する手法が紹介されていますが、自分の環境では、社員とはいえ他者に見られる可能性があるためやめました。
またやるとなるとTemplateを用いて${HOME}/.ssh/configもコントロールする必要があるので、これもしていません。
yadm hook
yadmはgitのwrapになっていますが、そのgitにおけるhookを仕込むことができます。
Hooks
For every command yadm supports, a program can be provided to run before orafter that command. These are referred to as…
yadm.io
こちらも今のところ使っていません。
なにか思いついたら追加していこうと思います。
感想
一通り、yadmの説明をしてみました。
これでmacOSとLinuxのdotfilesを管理できます。
実際にComparisonsでも紹介されていますが、dotfilesを管理する手法はいろいろあります。
他にもawesome-dotfiles Toolsを見れば、たくさんあります。
chezmoiあたりが新しくて多機能で、postもちらほら見るので良さげです。
rotzもOS別に設定だけでなくコンポーネントのInstallまでdotsというyamlやtomlやjsonで書けるconfigで制御できるみたいです。
yadmで自分は問題ないけど、mediamのpost書くためにchezmoiも使ってみようかな・・・
いやrotzの方が記事がないのでマニアックで良いかな🤣
bashのframeworkであるrerunでmacOSのsetupをしていますが、良いタイミングなのでやめるかなぁ・・・
rerunによる縛りがなくなればzshに移行できるぜ😆
Appendix: xdg-ninja
xdg-ninjaの紹介
GitHub - b3nj5m1n/xdg-ninja: A shell script which checks your $HOME for unwanted files and…
A shell script which checks your $HOME for unwanted files and directories. - b3nj5m1n/xdg-ninja
github.com
A shell script that checks your
$HOMEfor unwanted files and directories.Whenxdg-ninjaencounters a file or directory it knows about, it will tell you whether it’s possible to move it to the appropriate location, and how to do it.The configurations are from the arch wiki page on XDG_BASE_DIR, antidot (thanks to Scr0nch for writing a conversion tool), and crowdsourced by other users.
簡単にいうと${HOME}にあるファイルをXDG_BASE_DIRに移行できるものを列挙してくれます。
> xdg-ninja

~~~ 省略 ~~~
[zsh]: /Users/[Username]/.zshenv

  Move the file to "$HOME"/.config/zsh/.zshenv and export the following environment variable:

    export ZDOTDIR="$HOME"/.config/zsh

  You can do this in /etc/zshenv (Or /etc/zsh/zshenv, on some distros).

[zsh]: /Users/[Username]/.zshrc

  Move the file to "$HOME"/.config/zsh/.zshrc and export the following environment variable:

    export ZDOTDIR="$HOME"/.config/zsh

  You can do this in /etc/zshenv (Or /etc/zsh/zshenv, on some distros).

Done checking your $HOME.
このような出力をしてくれ、XDG_BASE_DIRへ移行するのに便利です。
自分の場合はyadmで管理し始めたため、一部環境ごとに別々にしたいものなどがあるためすべての対応をするのではなく、選択して対応しています。
ターミナル環境について他の記事も書いているので、よろしければこちらもご覧ください!
『ターミナルがダサいとモテない』シリーズ一覧
転載:ターミナルがダサいとモテない。macOSとLinuxのXDG_CONFIG_HOMEを共有するぞ - yadm編
この記事は Medium(@yusuke_h) からの転載です。
この記事を書いた人