目次
どうも。しみちゃんでございます。
今回は、マニュアルで作成したLBのバックエンドにGKEやGCSを指定しよう、というパターンの紹介です。
Webコンソールや Ingress などを使用してLBを立てていると、普段なかなか意識しないリソースの設定などでハマったりするので、そういったポイントをお話したいと思います。
はじめに
GKE, k8s, またそれにまつわるリソースの説明については割愛します。
他の記事で、GKEについて紹介しているものもあるので、よかったらそちら(記事のハッシュタグ#gkeをクリック)を参照ください。
前提
今回の記事は下記の部分まで進んだ前提でお話を進めます。 また、構築には terraform を使用します。
- 公開用GCSバケットを作成していること
- GKEクラスタを作成していること(今回はリージョナルで立てています)
- Terraform v0.11.14 + provider.google: version = “~> 3.7”
GKEでサービスを作成する
マニフェスト
クラスタ上に、合計2つのサービス(今回はshimizuapp, grasysappという名前)をデプロイします。
コンテナの中身は nginx をほぼそのままのせているだけです。
マニフェストは片方だけしか載せていませんが、nameやportなど一意にすべきものはのぞいて、同じ設定でデプロイしています。
1.Deployment (spec.templateを抜粋)
...
  template:
    metadata:
      name: shimizuapp
      labels:
        app: shimizuapp
    spec:
      containers:
      - name: nginx
        image: nginx:stable-alpine
        env:
        - name: NGINX_HOST
          value: "hogehoge.com"
        - name: NGINX_PORT
          value: "8080"
        ports:
        - containerPort: 8080
          protocol: TCP
        readinessProbe:
          httpGet:
            scheme: HTTP
            path: /check
            port: 8080
        volumeMounts:
        - name: conf-volume
          mountPath: /etc/nginx/conf.d
      ...
2.ConfigMap
apiVersion: v1
kind: ConfigMap
metadata:
  name: nginx
data:
  virtualHost.conf: |
    log_format ltsv   'time:$time_iso8601\t'
                      'remote_addr:$remote_addr\t'
                      'request_method:$request_method\t'
                      'request_uri:$request_uri\t'
                      'https:$http_x_forwarded_proto\t'
                      'uri:$uri\t'
                      'status:$status\t'
                      'referer:$http_referer\t'
                      'forwardedfor:$http_x_forwarded_for\t';

    server {
        listen       8080;
        server_name  _;
        access_log  /var/log/nginx/access.log ltsv;

        location / {
            root   /usr/share/nginx/html;
            index  index.html index.htm;
        }
        location /check {
            return 200 ;
        }
    }
---
3.Service
apiVersion: v1
kind: Service
metadata:
  name: shimizuapp
  namespace: default
  labels:
    app: shimizuapp
spec:
  type: NodePort
  ports:
  - port: 8080
    targetPort: 8080
    protocol: TCP
    nodePort: 30080
  selector:
    app: shimizuapp
メモ
初めの注意点として、 Service では spec.ports.nodePort で port を指定してあげてください。あとで、 名前付きポート の設定を付与する時に必要です。
クラスタ内で同じ port は作成できないので、異なる port で設定します。
できたものがこちら。
# kubectl  get svc -o wide
NAME         TYPE        CLUSTER-IP     EXTERNAL-IP   PORT(S)          AGE     SELECTOR
grasysapp    NodePort    10.7.240.186   <none>        8080:30081/TCP   6m50s   app=grasysapp
shimizuapp   NodePort    10.7.243.77    <none>        8080:30080/TCP   18m     app=shimizuapp
# kubectl get po
NAME                         READY   STATUS    RESTARTS   AGE
grasysapp-869cc776ff-f45r9   1/1     Running   0          8m51s
grasysapp-869cc776ff-xgfv4   1/1     Running   0          8m51s
shimizuapp-c9889d84c-qz6h9   1/1     Running   0          10m
shimizuapp-c9889d84c-tlg7k   1/1     Running   0          10m
LBを作る前に
ここが普段あまり触らないリソースがゆえに、ハマりやすいポイントです。
GKEによってできたインスタンスグループに、先ほど作成した Service の nodePort を 名前付きPort として設定してあげます。
ここで、設定をしっかり行っておかないと ヘルスチェックは通っているのに、status:502 errorが返ってくる といった現象が発生したりします。
これは Internet -> LB -> Service(k8s) と接続する時に、どの(Serviceが待ち受けている) port を使用するかを認識させるために必要です。
まずは、GKEによって作成されたインスタンスグループを gcloud compute instance-groups managed list で確認します。
# gcloud compute  instance-groups managed list
gke-shimizu-webapp-dev-app-8c257106-grp         asia-northeast1-b  zone   gke-shimizu-webapp-dev-app-8c257106         1     1            gke-shimizu-webapp-dev-app-8c257106         no
gke-shimizu-webapp-dev-app-9521b1ca-grp         asia-northeast1-c  zone   gke-shimizu-webapp-dev-app-9521b1ca         1     1            gke-shimizu-webapp-dev-app-9521b1ca         no
gke-shimizu-webapp-dev-app-d177c78a-grp         asia-northeast1-a  zone   gke-shimizu-webapp-dev-app-d177c78a         1     1            gke-shimizu-webapp-dev-app-d177c78a         no
gcloud compute instance-groups managed set-named-ports を使用して、 named-port を設定します。
設定は gcloud compute instance-groups managed get-named-ports で確認できます。
#!/bin/bash
named_port='shimizuapp30080:30080,grasysapp30081:30081'

gcloud compute  instance-groups managed list | grep shimizu \
  | while read list
    do
      group=""
      zone=""

      group=$(echo $list | awk '{print $1}' || echo "null")
      zone=$(echo $list | awk '{print $2}' || echo "null")
      echo "group: $(echo $list | awk '{print $1}') zone: $(echo $list | awk '{print $2}')"

      gcloud compute instance-groups managed set-named-ports $group --named-ports=$named_port --zone=$zone
      gcloud compute instance-groups managed get-named-ports $group --zone=$zone
    done

exit
# ./upate_named-port.sh
group: gke-shimizu-webapp-dev-app-8c257106-grp zone: asia-northeast1-b
Updated [https://www.googleapis.com/compute/v1/projects/grasys-dev/zones/asia-northeast1-b/instanceGroups/gke-shimizu-webapp-dev-app-8c257106-grp].
NAME             PORT
shimizuapp30080  30080
grasysapp30081   30081
group: gke-shimizu-webapp-dev-app-9521b1ca-grp zone: asia-northeast1-c
Updated [https://www.googleapis.com/compute/v1/projects/grasys-dev/zones/asia-northeast1-c/instanceGroups/gke-shimizu-webapp-dev-app-9521b1ca-grp].
NAME             PORT
shimizuapp30080  30080
grasysapp30081   30081
group: gke-shimizu-webapp-dev-app-d177c78a-grp zone: asia-northeast1-a
Updated [https://www.googleapis.com/compute/v1/projects/grasys-dev/zones/asia-northeast1-a/instanceGroups/gke-shimizu-webapp-dev-app-d177c78a-grp].
NAME             PORT
shimizuapp30080  30080
grasysapp30081   30081
それでは、LB を作成していく!
まずは、 外部IPとヘルスチェックをを定義します
以下、 2つのサービス(shimizuapp, grasysapp) のうち、片方の tf ファイルしか記載していませんが、 もう1つのリソースを作成するには名前や変数をそれぞれ置き換えてください。
また、ヘルスチェックの port やパスを間違えていると、 LB から正常とみなされなくなるので、注意が必要です。
ここで、最後まで作成しても、ヘルスチェックが通らない、といった場合は
- パスはあっているか
- コンテナ port がちゃんと空いているか
- nginx.conf などで、LBからのアクセスを拒否していないか
などを疑ってみてください。
####################
# External IP
resource "google_compute_global_address" "gke-lb-dev-shimizuapp" {
  name         = "gke-lb-dev-shimizuapp"
}

####################
# Health Check
resource "google_compute_health_check" "gke-lb-dev-shimizuapp" {
  name                = "gke-healthcheck-https-lb-dev-shimizuapp"
  description         = "health check for shimizuapp"

  http_health_check {
    port                = 30080
    request_path        = "/check"
  }
}
バックエンドサービスを設定します。
名前付きポートは先ほど設定した named-port の名前を、
backend.group についてはそれぞれのインスタンスグループのリンクを、
細かなパラメータについては ingress で LB を立てた時に import した設定をそのまま反映しま す。
GKEでオートスケーリングをする予定であれば、特に分散周りのパラメータについては注意が必要です。
どこか特定の場所にトラフィックが偏り続けると、不必要にスケールアウトしたり、ピークタイムをすぎてもスケール前の状態に戻りずらくなったりします。
負荷試験の実施前であれば、 Ingress で自動で設定されたものを import してそのまま使用するのが無難かと思います。
#####################
## Backend Service
resource "google_compute_backend_service" "gke-lb-dev-shimizuapp-backend-service" {
  name        = "gke-lb-dev-shimizuapp-backend-service"
  # 先ほど設定した named-port の名前を指定する
  port_name   = "shimizuapp30080"
  protocol    = "HTTP"
  timeout_sec = 30             # default
  enable_cdn  = false

  backend {

    # asia-northeast1-a
    description     = "GKE Backend for shimizuapp aisa-northeast1-a"
    # gcloud compute  instance-groups managed list --format=json でインスタンスグループを確認する
    group           = "https://www.googleapis.com/compute/v1/projects/grasys-dev/zones/asia-northeast1-a/instanceGroups/gke-shimizu-webapp-dev-app-d177c78a-grp"

    balancing_mode  = "RATE"  # UTILIZATION(default) or RATE # imported parameter gke backed generated by ingress
    capacity_scaler = 1            # # imported parameter gke backed generated by ingress
    max_rate                     = 1 # imported parameter gke backed generated by ingress
    max_connections              = 0 # imported parameter gke backed generated by ingress
    max_connections_per_endpoint = 0 # imported parameter gke backed generated by ingress
    max_connections_per_instance = 0 # imported parameter gke backed generated by ingress
    max_rate_per_endpoint        = 0 # imported parameter gke backed generated by ingress
    max_rate_per_instance        = 0 # imported parameter gke backed generated by ingress
    max_utilization              = 0 # imported parameter gke backed generated by ingress
  }
  backend {
    description     = "GKE Backend for shimizuapp aisa-northeast1-b"
    group           = "https://www.googleapis.com/compute/v1/projects/grasys-dev/zones/asia-northeast1-b/instanceGroups/gke-shimizu-webapp-dev-app-8c257106-grp"
    balancing_mode  = "RATE"  # UTILIZATION(default) or RATE
    capacity_scaler = 1            # # imported parameter gke backed generated by ingress
    max_rate                     = 1 # imported parameter gke backed generated by ingress
    max_connections              = 0 # imported parameter gke backed generated by ingress
    max_connections_per_endpoint = 0 # imported parameter gke backed generated by ingress
    max_connections_per_instance = 0 # imported parameter gke backed generated by ingress
    max_rate_per_endpoint        = 0 # imported parameter gke backed generated by ingress
    max_rate_per_instance        = 0 # imported parameter gke backed generated by ingress
    max_utilization              = 0 # default 0.8 # imported parameter gke backed generated by ingress
  }
  backend {
    description     = "GKE Backend for shimizuapp aisa-northeast1-c"
    group           = "https://www.googleapis.com/compute/v1/projects/grasys-dev/zones/asia-northeast1-c/instanceGroups/gke-shimizu-webapp-dev-app-9521b1ca-grp"
    balancing_mode  = "RATE"  # UTILIZATION(default) or RATE # imported parameter gke backed generated by ingress
    capacity_scaler = 1            # # imported parameter gke backed generated by ingress
    max_rate                     = 1 # imported parameter gke backed generated by ingress
    max_connections              = 0 # imported parameter gke backed generated by ingress
    max_connections_per_endpoint = 0 # imported parameter gke backed generated by ingress
    max_connections_per_instance = 0 # imported parameter gke backed generated by ingress
    max_rate_per_endpoint        = 0 # imported parameter gke backed generated by ingress
    max_rate_per_instance        = 0 # imported parameter gke backed generated by ingress
    max_utilization              = 0 # default 0.8 # imported parameter gke backed generated by ingress
  }

  health_checks = [ "${google_compute_health_check.gke-lb-dev-shimizuapp.self_link}" ]
}
GCS のバックエンド設定もしてあげます。
####################
# Backend Bucket
resource "google_compute_backend_bucket" "gke-lb-static-images" {
  name        = "gke-lb-dev-static-images"
  description = "GCS Backdend for GKE"
  #bucket_name = "${google_storage_bucket.static.name}"
  bucket_name = "shimizu-gcs-public"
  enable_cdn  = false
}
最後に、 target http proxy と forwarding rule を設定します。
####################
# HTTP Proxy
resource "google_compute_target_http_proxy" "gke-http-lb-dev-shimizuapp" {
  name        = "gke-lb-dev-shimizu-target-proxy-shimizuapp"
  url_map     = "${google_compute_url_map.gke-lb-dev-shimizuapp.self_link}"
}

####################
# Forwarding Rules
resource "google_compute_global_forwarding_rule" "gke-http-lb-dev-shimizuapp" {
    name        = "gke-http-lb-dev-shimizuapp"
    target      = "${google_compute_target_http_proxy.gke-http-lb-dev-shimizuapp.self_link}"
    ip_address  = "${google_compute_global_address.gke-lb-dev-shimizuapp.address}"
    ip_protocol = "TCP"
    port_range  = "80"
}
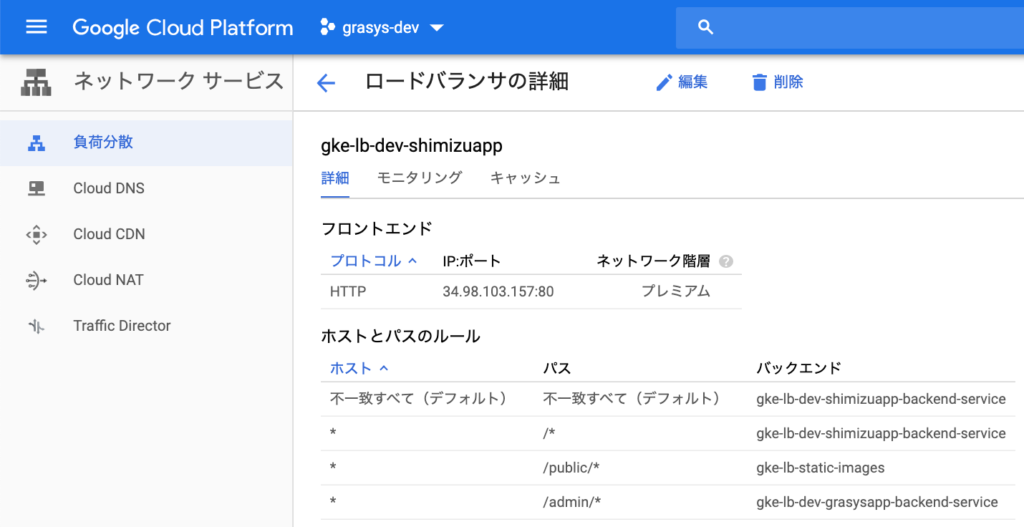
作成したものがこちら。
うまく設定できていれば、こんな感じでそれぞれのバックエンドが紐づいているはずです。

終わりに
どうだったでしょうか。うまく設定できたでしょうか。
今回のパターンはどうしても、 GKE と GKE以外のリソースを使いながらLBを運用したいといった場合など、使うケースはかなり限られています。
LB 周りは一通り動かすのに、ただでさえ操作するリソースが多いのに、GKEを絡めていくと更に設定が必要になるので、ちょっと面倒だなと感じてしまいますね。
( GCS なら、バケットをマウントする GCSFuse などがありますし。。。)
とは言え、マニュアルで細かく設定できるようになれば、
GCEなどでも併用して使えるようになるため、選択肢としては一応もっていて損はないと思います。
今回はここまで。ではでは。
株式会社grasys(グラシス)は、技術が好きで一緒に夢中になれる仲間を募集しています。
grasysは、大規模・高負荷・高集積・高密度なシステムを多く扱っているITインフラの会社です。Google Cloud (GCP)、Amazon Web Services (AWS)、Microsoft Azureの最先端技術を活用してクラウドインフラやデータ分析基盤など、ITシステムの重要な基盤を設計・構築し、改善を続けながら運用しています。
お客様の課題解決をしながら技術を広げたい方、攻めのインフラ技術を習得したい方、とことん技術を追求したい方にとって素晴らしい環境が、grasysにはあります。
お気軽にご連絡ください。


